Saturday, August 7, 2010

Pesto Genovese

Hi everyone, it's Paul.  I haven't posted for a while, but I'm back with another recipe.


Not just ANY recipe, though - for me this one is the big daddy, the #1, the ne plus ultra.  It's pesto Genovese, and it's my go-to dish whenever I'm expected to make food for a dinner party, a potluck, a tasty meal at home, whatever.  Easy to make, doesn't use too many dishes, flexible in its proportions, and consistently, reliably, GOOD.

What's more, it's a world apart from any pesto you will ever buy in a jar or find at a restaurant.  Which means it's much, much better than the pesto that anyone you'll be serving it to has had, unless they've made their own or eaten someone else's homemade.

Just think:  You'll have the nice couple you invited over for dinner tonight fighting over the last bits in the serving bowl, and greedily licking the serving spoon like crazed animals.  The ladies at the church group picnic will be rolling their eyes heavenward and near-blaspheming with every bite.  You'll dazzle your spouse, taking them back to the magical time when you first met and didn't yet know what each others' used Q-tips looked like.  You'll earn enough "points" to preemptively offset years and years of poor behavior on your part.

Am I full of hyperbole and empty promises?  Try it and see.

Makes about 6 servings, and takes from 20-40 minutes depending on your chopping and grating skills...
Here's what you'll need:


1. 3/4 cup extra-virgin olive oil

2. Fresh ground pepper

3. Salt (preferably Kosher)

4. 1/3 cup raw pine nuts

5. 3 cloves garlic

6. Pasta - a small-to-medium shape with ribs to hold the sauce is best. Penne or pipe rigate are good choices and easy to find.

7. Parmigiano-reggiano and pecorino romano cheeses - you'll need 1/2 cup grated of each.  It's very important to use freshly bought cheese in this recipe. I've tried making it with cheese that's been in the fridge for a while and has gotten a little dry, and it makes the difference between "meh" and "WOW."

8. 2 packed cups basil leaves - like the cheese, the quality of the basil is very important here.  Basil's highly perishable once it has been picked, and you need the leaves to be perfect.  Pesto, you see, is a raw sauce, so you don't want to use any leaves that don't look good enough to just pop in your mouth.

    We grow our own basil, and I'm a little in love with it because it's so good.


But, you can also find some good basil at your local farmer's market, or failing that at Trader Joe's or Whole Foods (be careful that the TJ's stuff isn't moldy though, give a close look inside that plastic box).

Oh yeah, I didn't take a picture of it but you'll need a little butter too.

Ready to go?  Here's what you want to do:

Step 1: Fill a large pot with water for the pasta, put it on the stove on high heat, and add a good quantity of salt.


Step 2: Put your 3/4 cup olive oil into a mixing bowl or plastic storage container.  You'll be mixing the sauce in here, so give yourself some room, and if you're planning on having leftover it's easy to just make it right in whatever you'll be storing it in.


Step 3: Pick, wash, and dry your basil.  If you've bought it on the stalk (most likely), lovingly pick all the leaves from the stems, because you don't want any stems.  Yes, it has to be done with love.
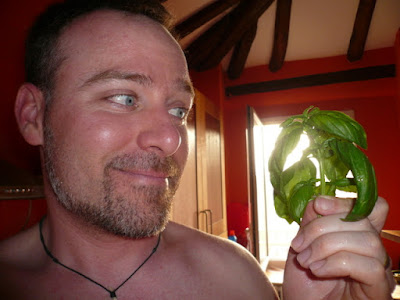

My favorite way to wash the basil is to fill our salad spinner bowl with plenty of cold water, put the basil in, and swish it around.  All the sand will drop to the bottom.  Then just use the salad spinner to dry.


Step 4: Chop dat basil.  Hand chopping is what I recommend, but you have to be patient and consistent...if you're feeling lazy you can put it in a food processor and "pulse" chop it, but BE CAREFUL not to liquefy the basil.  Little rustic-looking squares that measure about 1/16" are ideal.
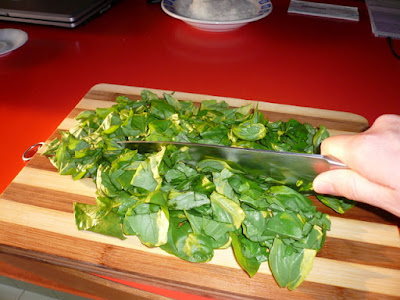


It will take a while, cause 2 packed cups of basil leaves is a lot.  If you need some inspiration, here you go:


When you're done, immediately put the basil into the container with your olive oil and swish it around so it's covered.  Keeps the basil from oxidizing and turning dark.


Step 5: Time to do the same thing to the garlic, except you actually want to mince it.


Be very careful not to leave any big pieces, because like I said this is a raw sauce and munching down on a big piece of raw garlic isn't the most fun.  If you can't mince it by hand, a garlic press will do.  Once it's done, put the garlic into your oil-basil mixture and again swirl it around to mix a bit.

Step 6: Now, get your pine nuts. I like to use a "healthy" 1/3 cup.

Put them in a heavy-bottomed pan, cast iron if possible, and set them over LOW heat. You need these suckers to toast only a little, and if the heat is too high they'll burn.


Step 7: Grate the cheese, 1/2 cup of parmigiano and 1/2 cup of romano, mixing the grated cheeses is fine. It's easiest to do it into a separate bowl or pan, and then scoop it with your measuring cup.

I use this little Italian hand grater, otherwise known as "Satan" due to the ridiculously aggressive teeth, painfully uncomfortable handle, and overall unstable/poor design that give it an uncanny propensity to nip fingers. If you have ANYTHING else, use it. Blood in your pesto is never a good thing.

When you're done grating the cheese, thoroughly mix it into the oil/basil/garlic. Voila, you should see a nice texture appear in your sauce. But you're not quite done yet.

Step 8: Check those pine nuts! Toss them around in the pan a bit to make sure they're getting evenly browned. When most have got a nice toasty brown, it's time to do some more chopping. Now, these, you NEED to hand-chop. It's one of the things that make this pesto better than the others. You want to get a nice variety of pine nut pieces....no whole nuts, but chop them roughly so that there are some biggish pieces, some tiny crumbs, and everything in between.

Seriously, all the old Ligurian Nonnas at the local PTA meeting are going to cry with jealousy.


When you've chopped the nuts to satisfaction, mix them on into your sauce. Add some healthy grinds of black pepper, and a small amount of salt, maybe 1/4 tsp.

Your pesto, friends, is done, and it's amazing, but don't jump the gun because there's a few more things to discuss.


The pesto can sit so go ahead and throw your pasta into the water, which should be good and boiling by now. When it's done, though, here's what you wanna do. It's one of the other things that is going to make this dish great.

You see, pesto looks really nice on pasta when it's all served in kind of a blob, and you let the guests mix it themselves.  But drained pasta, sitting in a bowl with no sauce to coat it, will stick to itself very quickly.  So here's what you want to do.  When you put your drained, hot, ready-to-go pasta into the serving bowls, get that butter that I mentioned earlier, and put a nice pat on top of each bowlful.  Now take some spoons or something and GENTLY (so you don't break the pasta) mix it around, melting the butter and coating the pasta with it.


Now, you can put your pesto on top and serve, and the pasta won't stick! A little sauce goes a long way, so don't overdo it.


One last tip. You'll likely have leftover pesto. Remember, this is a raw sauce and is best if it stays that way. So for the best flavor, store the sauce alone in the fridge, and make more pasta fresh when you want to eat it again. If you just make extra pasta the first time, put the extra sauce on it, and microwave the whole thing later (thereby heating/cooking the pesto), it won't be as good, I PROMISE.

Anyways, I hope you've enjoyed this. If everything goes according to plan, this will be your end result:


Oh, and as a final note - when it's been served, eaten, and you've won universal acclaim for your amazing pasta; when the Italian grandmothers fear and respect you, you've got Mario Batali leaving you incessant voicemails, and the paparazzi won't leave you alone because they just have to get a cover shot of THAT PERSON WITH THE AMAZING PESTO, just remember, don't pose for any pictures.

At least, not until you've checked a mirror.

Thursday, August 5, 2010

Real Life Garfield

I forgot to mention that the Sicilian hospitality extends to the animals too. Check out this alley cat eating a bowl of pasta.


And his friend looks like he has quite a habit!


Wednesday, August 4, 2010

Sicilian Spirit

I can’t stop thinking about Sicily, and in particular, about Anna’s mom’s homemade tomato sauce. That sauce alone sums up the two themes that keep coming back to mind when I think about the trip and the Sicilian spirit: hospitality and resourcefulness.

We travelled to Sicily from Bologna along with our friends Anna and Nick, who were visiting from Pasadena. Anna’s mom Teresa is Italian, originally from Sicily, and her dad Macy is from the States. After years of living abroad, her parents retired in Sicily. For the first few days of our trip, we all stayed at their home in Sciacca, which is along the Southwestern coast.


Anna’s parents welcomed us just like family. In fact, we were welcomed into the whole network of family and friends during our short visit there. The first evening we went to a 1st birthday party for a baby in the family. There were around 30 guests, and the family and friends quickly learned our names and made an effort throughout the night to get to know us and look out for us to make sure we were included. Their hospitality was certainly reflected in the food, and many of the relatives asked us if we had made sure to try everything and encouraged us to have more. The dinner buffet included various salads with vegetables and shrimp, octopus, and beef. There were various types of couscous and pasta dishes, arancini (risotto balls), as well as cutlets of swordfish. The dessert included watermelon, lemon granita, mulberry granita, and a huge birthday cake with a light chocolate mousse.

On the second night, we were invited to Anna’s family friends’ Sina and Michele’s farm house to learn to make pizza in their wood-burning oven. Once again, we received an impressively warm welcome and were quickly integrated with the family. Michele gave us a tour of the farm, where they grow a wide array of crops, ranging from grapes and citrus to eggplants and broccolini. He explained that it is better for the soil to grow an assortment and to rotate the crops, and having a variety also allows the family to rely on the produce for their own household.

Many of the pizza ingredients, such as the eggplant and tomatoes, came straight from the farm. Michele and Sina sent us home with more homemade pizza than we knew what to do with, urged us to come back and visit again, and even called us later in the week to wish us a happy wedding anniversary.

At Anna’s family’s house, her parents spent much of the days cooking specialties for us which highlighted their local produce. Macy and Teresa have a grove of olive trees on their property, and they use the olives to produce their own olive oil each year, which they use exclusively in their kitchen. They also make their own tomato sauce from local tomatoes when they are in season, and freeze enough to use later in the year as well. I can’t stop thinking about that sauce. On the first day, Teresa made a simple pasta with her sauce, topped with sautéed eggplant and parmesan cheese. It was so good that it has been on my mind regularly for over 3 weeks now, and I can assure you that I will never forget it. A simple dish of this nature would not be memorable without the homemade sauce.

Sicilians make amazing use of what grows on the island, and Teresa said that friends are constantly giving her some of what they grow in their own yards. Caper plants seem to be crawling out of cracks almost like weeds, and these capers are a central ingredient in the local cuisine.

Even the jasmine and cactus plants which are ubiquitous are used for desserts: here are the plants growing around town, and here is a granita we had with the flavors jasmine and cactus fruit.


Food is prepared resourcefully, and with love. Even on the day where we went to make pizza for dinner, Anna’s parents made eggplant parmesan to take to the party, as the time was short and they wanted to make sure we had a chance to try it. Hands down this was the best eggplant parmesan we have ever tasted, and in fact it was nothing like what I have tried in the past. Macy also made several trips to local bakeries to bring home specialties that they wanted us to try, including cannoli and almond cookies.


On the day we went to sightseeing to the temples in Agrigento, Teresa packed us a big picnic lunch, and she did the same for us the day we left so we would have something to eat on the bus. Mind you they fed us a wonderful, abundant lunch with all of the courses right before we left, so the picnic for later really wasn’t necessary, but rather another thoughtful gesture.


We received so much hospitality that it extended beyond even those we met directly. After talking with Paul about his distant relatives from Puglia, Teresa promptly called her friend who lives in the town where Paul’s grandfather was born to see if she knows any Venturas. She didn’t offhand, but made a few calls to Venturas from the phone book and has even visited City Hall twice now to help us locate Paul’s family. This friend has now offered to have us visit her in Puglia. The hospitality is still continuing on!

It could be easy to think that we just received this type of hospitality just because we were with our good friends Anna and Nick at their family’s home. However, consider the following which happened later in our trip: the man who worked at the desk of the hotel offered to drive us to the train station in his own car after his shift ended, the man selling watermelon insisted that his melon was a gift because it was our last night in Sicily, and woman who owned the restaurant where we had lunch one day brought us 2 extra courses to try, on the house, and then only charged us for a fraction of the things we actually did order.


Anna summed it up perfectly when she said, "Sicilians may not have a lot, but they love to share what they do have."

I hope Paul and I can show some Sicilian spirit at our house here in Bologna and beyond, and can’t wait to go back some day, hopefully again with Anna and Nick, to learn even more.

Monday, July 26, 2010

Couscous with Summer Vegetables

Lately I've been feeling like eating very lightly. It's probably the combination of overdoing it a little while in Sicily a few weeks ago and also the hot weather, which tends to make me lose my appetite.

Tonight I made a simple whole wheat couscous with some sautéed vegetables. Paul and I found a big natural foods market today just outside of the city walls of Bologna, so that is where we got the couscous.

I got the inspiration for the dish from a biodynamic cooking class I did with Slow Food Bologna where we made couscous, and also from visiting the Trapani area in Sicily, where couscous is one of the specialties.

One of the new things I learned in the cooking class is that the couscous comes out better if you toast it first. I had never done this in the States before.

Below are two different presentation options for what I made, followed by the approximate recipe. I am more of an intuitive cook, so I encourage you to use your judgment and do what sounds good and looks right to you rather than measuring out the exact quantities I approximated below. Many other vegetables and herbs could be used instead.


Ingredients:

Couscous

2 cups dry whole wheat couscous

2 1/2 cups boiling water, or the proportional amount specified on the box

1/4 cup olive oil

Salt to taste

Vegetables

2 Tbs olive oil, or enough to cover the bottom of the pan

3 shallots, thinly sliced

2 cloves garlic, smashed

Fresh herbs: I used a sprig of rosemary and a handful of fresh sage, both chopped

3 small zucchini, sliced lengthwise and then diagonally into thin half moons

3 small carrots, thinly sliced about the same size as the zucchini

1 large heirloom tomato (or a few smaller ones), cut into cubes

Salt to taste

Garnish

1/4 cup toasted pine nuts


Directions:

In a small saucepan, heat the water to a simmer, as you will need it for the couscous.

Meanwhile, start the vegetables:

1) In a large sauté pan, heat the olive oil

2) Add shallots and garlic and sauté until fragrant

3) Add the zucchini and fresh herbs and cook on medium high heat until the zucchini are lightly browned. Remove from the pan and set aside. (I don't like soggy zucchini so I think it is best if you cook them on their own.)

4) Add the sliced carrots to the pan along with a little more olive oil if needed. Stir fry until they start to brown.

5) Add the tomatoes and continue to cook until the carrots are just starting to be tender.

6) Return the zucchini mixture to the pan, toss with the carrots and tomatoes, and add salt to taste. Remove the garlic cloves. Cover and set aside.

Start slowly toasting the pine nuts in another skillet for the topping. Meanwhile, make the couscous:

1) In a medium saucepan, heat half of the olive oil, about 2 tablespoons, on medium heat.

2) Add the couscous and toast it until some of the grains are golden brown.

3) Turn off heat and add the boiling water.

4) Cover and set aside for about 10 minutes.

5) Open the lid, fluff the couscous with a fork, and add the remaining olive oil and salt to taste.

Assemble:

1) Either mound the couscous into a cappuccino mug (about 1 measuring cup size) for each serving and invert onto a plate or shallow bowl, or simply spoon about a cup onto each plate.

2) If using the mold, spoon the vegetable mix around the couscous, or simply spoon it on top of the couscous.

3) Top with freshly toasted pine nuts.

Prep/cooking time: about 20 minutes. Serves 4.

Wednesday, July 21, 2010

Berkeley to Bologna, MO to BO: nostalgia and Slow Food for youth

I grew up in Berkeley, California, but because both of my parents are originally from Missouri (MO), I spent many summers as a child in the midwest. But for the last 14 years, since I was 18, I have lived elsewhere. One of the amazing and surprising things about living in Bologna, where I am now, is that it has brought me back to my roots of both Berkeley and St. Louis, especially now that summer has rolled around. A large university town, Bologna is known as the most liberal city in Italy. It is located in the upper middle of the country, and the summers are hot and humid. The combination of Birkenstock-clad folks roaming the streets and cicadas chirping in the trees has made me deeply nostalgic. This experience is particularly fitting because here in Italy, part of my project is to learn new approaches to bring the Slow Food movement to youth. This is much easier to do while feeling a resurgence of the magic of being young.

The nostaglia first hit me in early July, while Paul and I were camping with our new friends. While at a Slow Food cooking class sponsored by the Mercato della Terra here in Bologna, I met Simone, a dynamic leader of a Slow Food chapter in Faenza, which is about an hour east of Bologna, and his equally vibrant girlfriend Hande. We hit it off right away, as we are all about the same age and are passionate about making Slow Food relevant and more accessible to a younger crowd. Simone and Hande invited Paul and I to an event at “Pian di Stantino,” an agro-tourism (agriturismo) farm near Faenza. Called “PiandiStantinoStock,” the event had the flavor of a mini, tame Woodstock (minus the drugs and mud). The party started on a Saturday afternoon, and included dinner, a concert, camping, and a leisurely day of hanging out on the farm on Sunday.


Pian di Stantino is run by another young couple, Martino and Denise, who are friends of Simone and Hande. They are carrying on the family business begun by Martino’s father, not because they are obligated to, but because they are passionate about sharing the message of promoting a lifestyle that is more connected to the land. They live on the small farm, grow their own fruits and vegetables, raise goats and one big pig called Ciccia, or “Fatty,” and as a source of income they host guests for dinner and overnight stays.


Pian di Stantino isn’t a place you would find on accident; it is hidden in the hills outside of the city. Once we arrived, I felt completely removed from normal life, and for the first time in a long time, felt entirely relaxed.
Around 400 people came to the event, and many of them were in their 20s and 30s like us. Though there were many babies, young children, and older adults too. Upon arrival, we each paid 15 euro, and received a drinking-glass mason jar that was tied on a long necklace made of twine. The entrance fee covered everything: a dinner that featured organic produce, locally-made wine, the concert, camping, and even breakfast and a light lunch the next day for those that wanted to stay around. On Saturday afternoon the neighbors who raise sheep came by and did a demonstration to show the kids how the sheep are sheered and how the wool is dyed with natural materials such as pomegranates.


Here we are hanging out before dinner. Paul and I are in the lower left, to the right is a local winemaker and his daughter, and in the back are Simone (left) and Martino (right).


Dinner, served on plates made of tree trunks from the property, included pizzas cooked in the outdoor wood-burning oven.


Hande (middle below) and I (left) quickly jumped in on the pizza-making operation, and rolled enough pizzas to have sore palms the next day.


The above photo shows the pizza oven, and Denise is shown in action below on the left, followed by a photo of an organic crostata that she baked with homemade jam.


While making pizzas with the group, I was happily brought back to the days when I was working as a cook, and soaked up the familiar mix of camaraderie and friendly taunting in the kitchen that seems to transcend location, culture, and language. But in addition to the comforting sense of engagement that I found in cooking with friends for a crowd, the experience was new enough to seem a bit like a dream. Could I really be learning how to make authentic pizza in a wood burning oven in Italy in the middle of a forest? It was magical, and the feeling only continued as the night went on. Simone and Hande took us to a spot toward the edge of the forest where hundreds of fireflies lit up a marsh. The last time I saw a firefly was at my grandma’s house on a lake in Missouri when I was 10, and in the 22 years since then I had completely forgotten about them and found myself in awe. Simone, Hande, Paul, and I sat on bales of hay, drank wine, watched the miniature light show, and listened to the cicadas in between sets of the band which was playing nearby.

Here is a picture of one of the performances, which was a pair of dancers with torches.


The event wasn’t officially part of Slow Food, but it embodied the exact same philosophy, and I hope that through Slow Food we can work to give more people, especially youth, an experience like we had at Pian di Stantino. It is through casual, affordable, and experiential events like these, rather than fancy dinners, that we will reach and captivate the younger generation.

Chopped vegetable salad


The other night we ran out of lettuce, so I made a salad of what we happened to have around. I liked it so much that I will definitely make it again. Make sure to use really high quality cherry tomatoes – this is what I think made it taste especially good. Other types of radicchio, endive, or even red cabbage could be used too. You could also add a variety of other vegetables such as red or yellow peppers, mushrooms, or cucumber. To make it a main dish, add garbanzo beans and/or cheese.

Ingredients:

1 small round purple radicchio, about 3 to 4 inches in diameter.

1 carrot

1 cup cherry tomatoes (I used the Italian variety called datterini)

½ cup of fresh basil leaves

Olive oil

Vinegar, such as balsamic or red wine

Kosher salt and fresh ground pepper

Steps:

1) Cut the radicchio in half vertically, slicing through the core. Using a paring knife, cut out the core on each of the halves. Slice each half crosswise (horizontally) into thin ribbons of about 1 centimeter each. Rinse and dry, using a salad spinner if you have one.

2) Wash and peel the carrot, cut it half lengthwise, and slice it into thin half moons. Other shapes like julienne would work well too.

3) Wash and slice each of the cherry tomatoes in half.

4) Rinse the basil, remove the leaves from the stems, stack the leaves on top of each other and cut crosswise into ribbons about the same width as the radicchio.

5) Put all of the vegetables in a salad bowl and drizzle lightly with olive oil and vinegar, in about the ratio of 3 to 1. Add salt and pepper to taste.

6) Toss and serve.

Makes 2 generous portions, as shown in the picture.

Tuesday, July 6, 2010

Granita al Limone

As Paul mentioned in his last post, we needed a recipe to use the juice from the 22 Sorrento lemons that he zested for the limoncello. I’ve been ordering lemon granita and lemon sorbetto all over the place here in Italy, as I am crazy about anything lemon, so was inspired to see what it would be like to make granita al limone at home. It turns out that it’s not hard at all and I am very happy with the results. Plus, especially now that it is nearly 100 degrees during the day here in Bologna, it helps to be able to come home and find something icy and refreshing waiting in the freezer.


So, if you have a lemon tree and don’t know what to do with all of the lemons, just made limoncello and don’t want to waste the juice, and/or simply love lemon things like I do, I would highly recommend you try this. Try to choose a day to make it when you will be home for 4-5 hours and can stir it regularly as it freezes. Also make sure you have adequate space available in your freezer before you begin.
Here is the recipe. Adjust the quantities based on how much lemon juice you have. We had between 4 and 5 cups of juice, so I made 4 times this recipe.

Ingredients:

-2 cups water

-1 cup sugar

-1 to ¼ cups fresh lemon juice from high quality lemons, preferably from a neighborhood tree or a farmer’s market (approximately 5 lemons, depending on size). Start with about 1 cup lemon juice and add more from there after you taste it (in Step 4 below).

-Lemon zest (optional) from the above lemons. I didn't use any since it all went in the limoncello, and I thought the granita came out great regardless.

Steps:

1) Zest lemons. If you are using lemons that still have the zest on them (i.e. if you are not using lemons left over from making limoncello like I was), then you can wash them very well, zest the lemons, and use the zest to add extra flavor to the granita. The zest can be added to the boiling water along with the sugar in Step 3. If you want, you could also try adding some zest at the very end along with the lemon juice if you want fine pieces of zest in the final product. I have yet to see this here in Italy but I think it might be good.

2) Squeeze your lemons into a measuring cup and see how much juice you have. Set the juice aside. Adjust the quantities of water and sugar accordingly by using the ratios above.

3) Boil the water in a pot and stir in the sugar (and zest if using it, as described in Step 1). Stir well and simmer the sugar solution for about 5 minutes. Strain it if you added zest. Remove from heat and let cool to room temperature.

4) Stir the 1 cup lemon juice into the pot. Taste it to make sure you like the sugar/acid balance and add some of the remaining ¼ cup of juice if you would like for it to be more sour.

5) Put the mixture in the freezer. You can either leave the mixture in the same pot if it is not too deep and will fit in your freezer. Otherwise, transfer it to a shallower metal pan, such as a loaf pan (or 2 if you made a bigger quantity). I would suggest covering it with saran wrap or a lid to keep the flavor pure.

6) Stir periodically until frozen. Some recipes tell you to stir the mixture every half hour from when you start to freeze it. I found that mine wasn’t starting to freeze for a few hours, so it didn’t seem necessary to stir it right away, though I still did. The idea is that you want to break up the ice clumps around the edges of the pan before they turn too solid. You want to keep the texture uniform. I am not sure if it is just our freezer, but even after 2-3 hours, I found that there weren’t really any clumps to break, and at that point it was after midnight and I fell asleep. I woke up the next morning and found that the granita was frozen but I could still break it into an even texture with a fork. So in my case it was forgiving. To be safe, however, I would make it earlier in the day and try to mix/chisel it periodically until it is frozen. The goal is to have a uniform texture that has little tiny sheets/flakes of ice.


7) Transfer granita to an airtight container and store in the freezer. Take it out of the freezer 10 minutes or so before you want to serve it and chisel away at it to break it up again, if necessary. In the picture below, you can see that in the container on the right, I recently chiseled the granita before serving it, where as the container on the left hasn't been re-chiseled since I originally made it, so it would need to be chopped up before serving. Luckily it's not very hard to do.


Serve in small glasses with spoons. You can garnish it with a fresh lemon slice or a sprig of mint. The granita is perfect to eat in the afternoon on a hot day. It also makes a nice palate cleanser between courses for a fancy dinner– though only serve a tiny amount in this case, like a few spoonfuls in a tiny glass.

I hope you like it as much as I do! Let us know if you make it. And especially if anyone tries the recipe with Meyer lemons, let me know, as my friend Lisa and I are curious about how it will come out. I bet it will be great, so if you have Meyer lemons, I would try it. Other popular flavors of granita here in Italy are watermelon, mint, coffee, and almond. I want to try making coffee next.